
Guidelines & Prerequisites
1. General Instructions
- Whatever your camera setup, a tripod is highly recommended, as it allows most orientation and lens-height information to be applied to all the panoramas.
- Tripod height: Position your lens at or above the eye line. This is particularly important if there are surfaces like tables, shelves, etc. where the detail needs to be captured. Positioning the lens too low will result in occlusions and smearing when reconstructed in 3D.
- Exposure: Make sure all your panoramas have the exact same exposure and white balance.
- For HDR bracket sets, the aperture and ISO value of all the images must be identical – only the exposure can be varied. Also, the shutter speed of each image should follow a repeating sequence. (For example 1/25, 1/100, 1/400, 1/25, 1/100, 1/400.)
- Shoot a reference panorama that is centrally placed in each room. This will help to minimize floor-placement errors, and thus increase the accuracy of the overall reconstruction.
- Record the exact height of the nodal point of the lens (for your reference pano). Virtual Logic 360 tour editor derives all scaling and measurements from this initial value – so it’s critical that you record it accurately.
- Shoot panoramas on a grid – roughly 6m x 6m grid at around 30Mpx, using the smaller grid for lower resolution cameras (we use 4m x 4m for the Ricoh Theta S). Exact precision isn’t important – line-of-sight, perpendicularity, and overall coverage are what matters most.
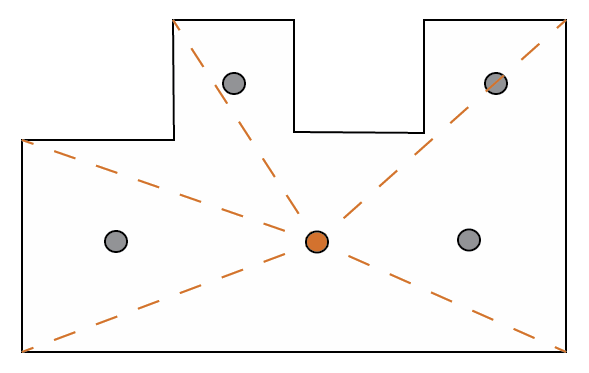
In the above image (a plan view of a room) we can see the reference panorama in the middle, with a line of sight to as many corners as possible. The other panoramas are positioned to provide good coverage of the various surfaces, with as much perpendicularity as possible (to offer the best quality imagery for each part of the room).
2. For DSLR
- Make sure the lens nodal point is precisely aligned – don’t rely on your stitching software to correct errors, because panoramas with corrections will make precise reconstruction impossible.
- When you stitch your panorama, start by switching off as many of the image corrections as possible. This way you can see exactly what distortions are being corrected and if your lens is properly configured.
3. For 360 Camera (e.g. Ricoh Theta V)
- For LDR, shoot low ISO and long exposure. The Ricoh is a great camera, but it’s very noisy at high ISO.
- For HDR, for now, use an app like hdr360 on the iPhone. It’s a bit expensive for what it is, and we will introduce our own, fully automated, Virtual Logic 360 Capture app later in the year.
4. Mandatory Prerequisite Before 2D Floorplans & 3D Dollhouse Order Processing
- The adjustment height of the tripod should remain the same.
- Larger rooms have more oblique angles, leading to distortion & less precision of dollhouse. To minimize the issue, please take some extra photos alongside 1 photo in the most central position in the room.
- Take photos in hallways. Also, it’s recommended to take exterior shots for an irregular-shaped house to avoid shape-related errors in the dollhouse.
- Try to keep open all the doors before taking your shot.
- Inaccurately stitched & tilted panoramas, which in turn affects the quality of the dollhouse & accuracy of the 2d plan.
- Try to avoid scanning a room with unnecessary items like clothes, toys, plastic, etc. on the floor. The cleaner the rooms, the more good-looking dollhouse.
- The unscanned room can’t be added to the dollhouse as no 360 texture is available for that particular room. The same thing is applicable for blind spots (the parts where no 360 scan is available) in a room.
- The perspective of the image is always fixed as it has been taken by a camera so whenever moving around the dollhouse view, the observer perspective is changing but captured perspective is not, for this reason, slight furniture distortion & overlapping might be seen.
- The provided 360 images will be used as the texture of the dollhouse, so the higher the quality of 360 images, the sharper the model will be.